INTEREST: dipping into Tiger... Now.

Apple's "Developer Connection" site has a few articles which give some good insight into some of the upcoming new technology to be included with Tiger.
Mac OS X v.10.4 Tiger Overview: New features, APIs, and frameworks.
Working with Spotlight: Powerful search technologies available to developers.
Developing Dashboard Widgets: Powerful mini-applications that are quick and easy to develop.
Developing 64-bit Applications: Mac OS X Tiger breaks the limitations of 32-bit computing.
Working with Automator: Extend the value of your application with Automator Actions and Workflows.
For example, here's a bit of the "Dashboard" documentation that talk about how to construct Dashboard's Widget's: ============================ http://developer.apple.com/macosx/tiger/dashboard.html What's Inside a Widget?
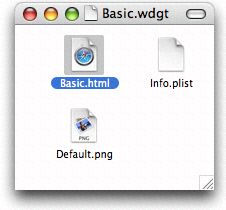
At its simplest, a Widget is simply a web page that is displayed in the Dashboard rather than in a browser, such as Safari. A Widget is contained on disk in a bundle—a directory that groups all the needed resources for the Widget together in one place. Widget bundles are named with the .wdgt extension. Like any other bundle, a Widget's bundle is managed by the Finder as a single entity.
A basic Widget contains the following files: ▪ A main HTML file defining the user-interface for the Widget. ▪ A default background image in PNG format that can be displayed by Dashboard while it loads the Widget. The PNG format is used because of its excellent support for alpha channel transparency. ▪ A property list file named Info.plist that contains a Widget's identifier, name, version information, size, and the main HTML page as well as other optional information used by Dashboard. • Develop widgets using industry-standard web technologies—HTML, JavaScript, and CSS • Create a widget using only a text editor and browser, such as TextEdit and Safari
=================
...another example comes from the "Automator" documentation: ======================== http://developer.apple.com/macosx/tiger/automator.html Using Automator
Automator comes preloaded with a large library of Actions. These Actions expose functionality built into the operating system, such as finding files with Spotlight, or the various applications that ship with the system, such as iPhoto, Mail, and iCal. There are also Actions that let you write shell scripts and AppleScripts. You can use these Actions to rename a group of files, create a new event in an iCal calendar, or to resize an image. This library of Actions is accessed and organized on the left hand side of the Automator window.
To assemble a Workflow from a set of Actions, simply drag-and-drop the Actions from the library into the sequence in which you want them to run. Each Action in the Workflow corresponds to an individual step that you would need to perform manually. Each Action comes with a small GUI panel that lets you tweak its options and settings. Automator shows these panels connected, along with the types of data that are flowing from one Action to another.
participants (1)
-
 billing